TIFF

Lets talk TIFF, or Tagged Image File Format. It is well documented and accepted by the community. The format has been around since 1986, first developed by Aldus as a image format for scanners. The TIFF format is now used worldwide as a preferred format for scanning and preservation of cultural heritage objects.

As amazing as the format is, there are a few features of the format which can be a preservation risk. I want to focus on three of those risks.

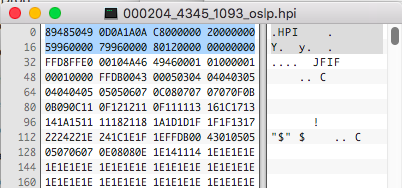
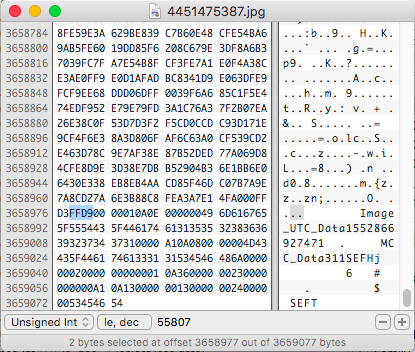
The Tagged Image File Format has a well known header:

A TIFF file begins with an 8-byte image file header, containing the following
information:
Bytes 0-1: The byte order used within the file. Legal values are:
“II” (4949.H) LSB (IBM)
“MM” (4D4D.H) MSB (Mac)
Bytes 2-3 An arbitrary but carefully chosen number (42).
Bytes 4-7 The offset (in bytes) of the first IFD.

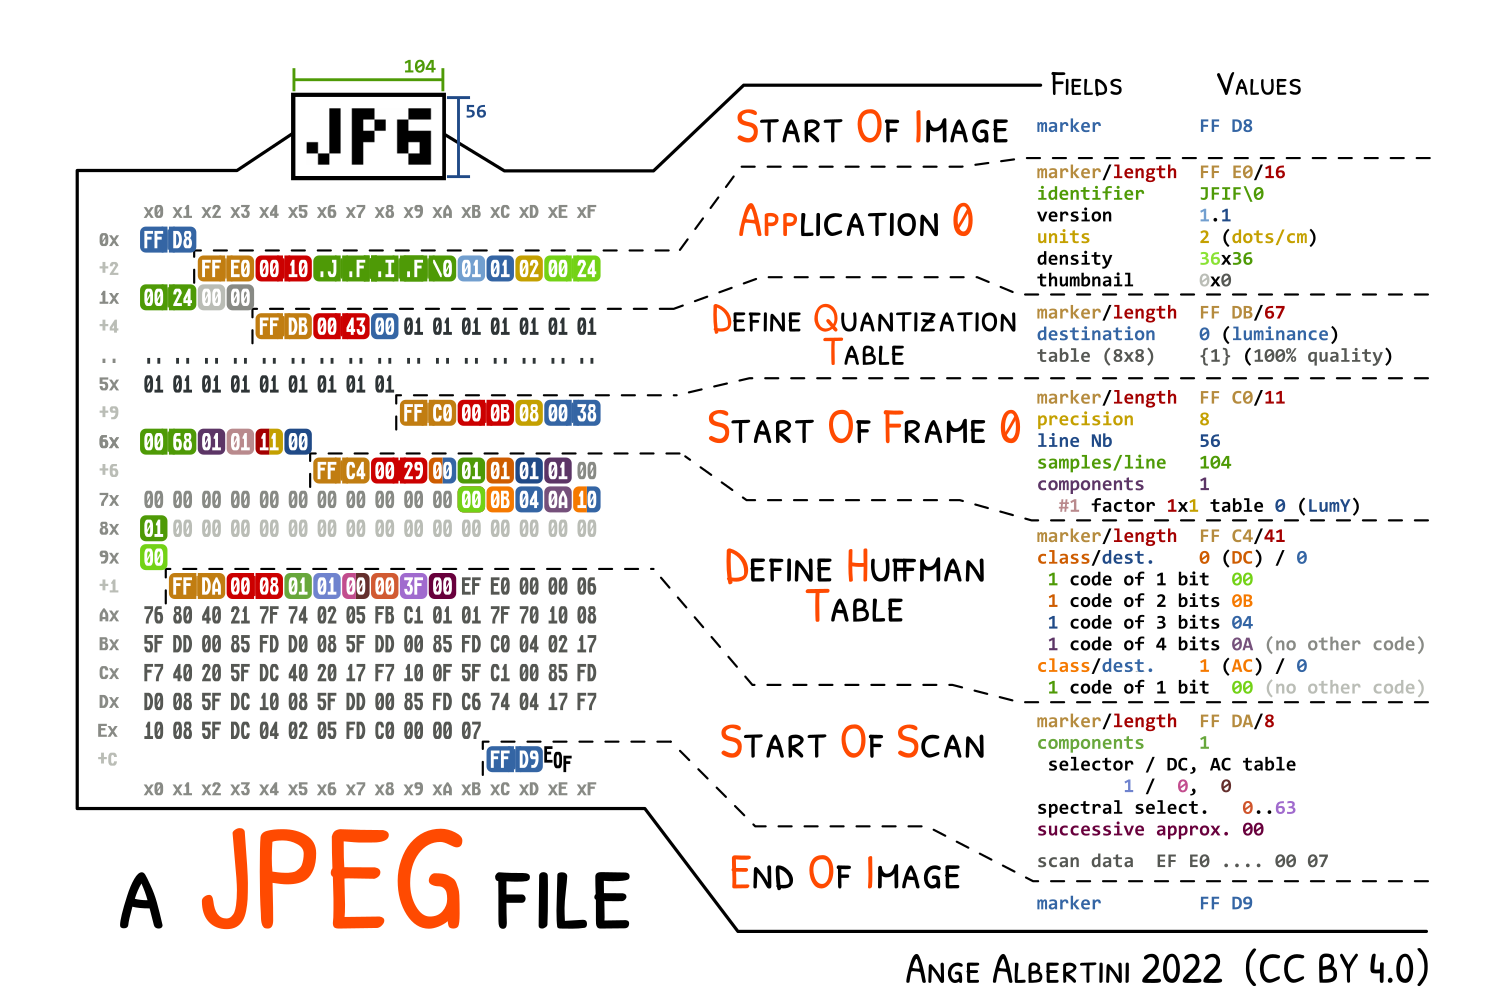
Putting this poster of the TIFF structure in your office will impress your co-workers, guaranteed. Thanks Ange!

The three risks I have been pondering lately are:

  • Multiple IFD’s
  • Metadata
  • DNG format

TIFF version 6.0 was released in 1992 and is the most recent version. Although some vendors are free to add their own private tags. In 1995 Adobe added an addendum which added some additions for use with PageMaker.

One of the main features of the TIFF format is its ability to hold multiple pages. In Adobe’s words:

TIFF has always supported what amounts to a singly linked list of IFD’s in a single TIFF file, via the “next IFD pointer,” though most applications currently ignore any IFD beyond the first one. Probably the best use for a linked list of IFD’s is when you want to store multiple different but related images in the same file—a ‘burst’ of images from a camera, for example.

Adobe PageMaker® 6.0 TIFF Technical Notes

Take note of the highlighted text, software like Adobe Photoshop will ignore any IFD beyond the first one. Even worse, Photoshop won’t even mention there are additional IFD’s. I have used many document scanners which default to multipage TIFF capture and have lost pages because of this. Because of this I have always built my workflows around single page TIFF’s for all scanning and we check against this as a rule.

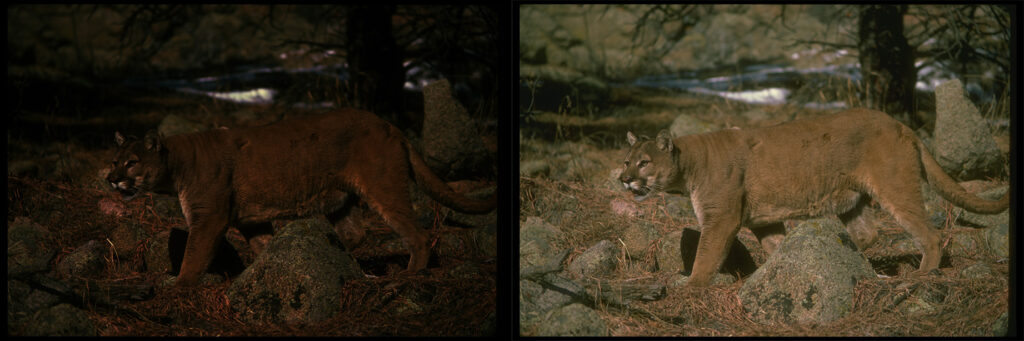
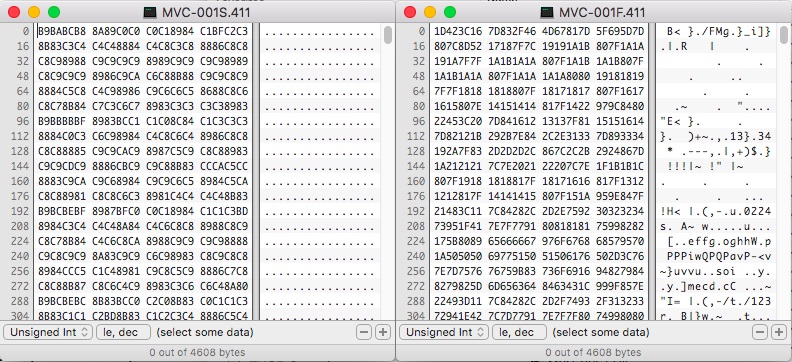
What also makes this hard is how some capture software uses additional IFD’s. CaptureOne is a popular imaging software used by photographers and cultural heritage institutions. We have used it to connect to our PhaseOne cameras for capture of books and other flat objects. By default the software exports the final TIFF image with a thumbnail.

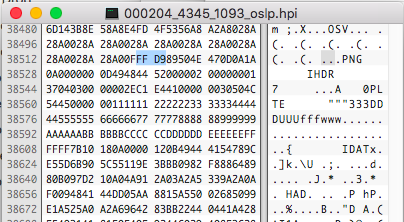
With the “No Thumbnail” unchecked we get this TIFF structure:

identify _MG_0193.tif 
_MG_0193.tif[0] TIFF 3456x5184 3456x5184+0+0 8-bit sRGB 51.3136MiB 0.030u 0:00.026
_MG_0193.tif[1] TIFF 107x160 107x160+0+0 8-bit sRGB 0.000u 0:00.007

 <IFD0:ImageWidth>3456</IFD0:ImageWidth>
 <IFD0:ImageHeight>5184</IFD0:ImageHeight>
 <IFD1:SubfileType>Reduced-resolution image</IFD1:SubfileType>
 <IFD1:ImageWidth>107</IFD1:ImageWidth>
 <IFD1:ImageHeight>160</IFD1:ImageHeight>
 <IFD1:BitsPerSample>8 8 8</IFD1:BitsPerSample>

So Imagemagick identifies two pages 0 and 1 with the second a much smaller resolution than the first. Exiftool reports back IFD0 and IFD1 with IFD1 having a SubfileType of a Reduced-resolution image. Makes sense, it is a thumbnail. In looking at the specifications for TIFF 6.0, I can find no mention of the word “thumbnail”, but the specification does make mention of “reduced resolution” images:

If multiple subfiles are written, the first one must be the full-resolution image. Subsequent images, such as reduced-resolution images, may be in any order in the TIFF file.

The specification also gives us this warning:

TIFF readers must be prepared for multiple images (subfiles) per TIFF file, although they are not required to do anything with images after the first one.

Scary to think about how a reader is not required to do anything, not even warn against multiple IFD’s (Subfiles).

The EXIF specifications seem to expand on this through attributes:

Attribute information can be recorded in 2 IFDs (0th IFD, 1st IFD) following the TIFF structure, including the File Header. The 0th IFD records compressed image attributes (the image itself). The 1st IFD may be used for thumbnail images. 

Page 97 of EXIF Specification

Take a look at the information and Figure 6 on page 21-22 in the EXIF specification.

Adobe early on decided to use their own tags for thumbnail data. Since Photoshop 5, Adobe has stored the thumbnail in Tag 1036.

 1036 Photoshop Thumbnail             : (Binary data 4625 bytes, use -b option to extract)

There is another TIFF structure sometimes used in older FAX compressed multipage TIFFs and now used in the DNG Specification. The SubIFD tag was writable using the libtiff “thumbnail” tool, but is now depreciated. Originally described in the TIFF/EP specification, DNG files use SubIFD trees.

DNG files are often talked about in the same way TIFF files are, and many tools handle both seamlessly. One of the major differences is that DNG files switch their IFD use. IFD0 is often the reduced-resolution thumbnail and SubIFD the full-resolution image.

<IFD0:SubfileType>Reduced-resolution image</IFD0:SubfileType>
<IFD0:ImageWidth>256</IFD0:ImageWidth>
<IFD0:ImageHeight>171</IFD0:ImageHeight> 

<SubIFD:SubfileType>Full-resolution image</SubIFD:SubfileType>
<SubIFD:ImageWidth>3516</SubIFD:ImageWidth>
<SubIFD:ImageHeight>2328</SubIFD:ImageHeight>

This can cause issues when trying to extract technical metadata from images, knowing which IFD to get the main image details requires a bit of work. I’ll save DNG for another blog post.

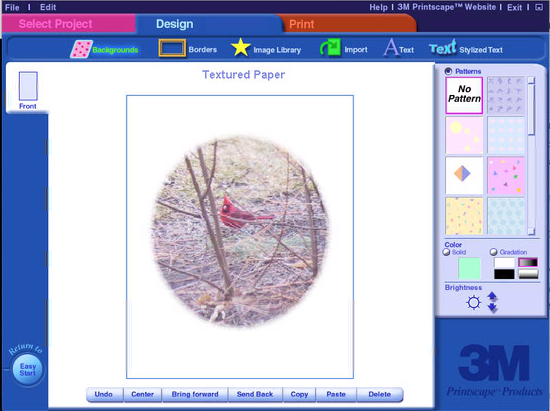
TIFF Metadata is a vital part of preservation. The metadata can provide technical properties of the file along with some descriptive information. It amazes me how much the embedded metadata can vary from a scanner or camera capture device. The digitization lab I worked in for years had scanners from Epson, Fujitu, Canon and others. Along with cameras made by Canon, PhaseOne, and Copibooks. Each one with a vastly different set of metadata using different standards. Even when each workflow produced final uncompressed TIFF images, they all varied in metadata.

The TIFF images with the leasT amount of metadata was from the Epson scanners. When using the free Epson Scan software, not a single metadata field was embedded, no dates, scanner model or manufacturer. More was embedded when you used the Silverfast professional software included with each Epson, but even then if you didn’t add any IPTC fields, the metadata was limited.

The most metadata came from the camera systems, especially the PhaseOne/CaptureOne systems. Even though it produced the most and had valuable properties, there were some issues. I already discussed the thumbnail issue, but PhaseOne decided they wanted to change how some of the tags were used.

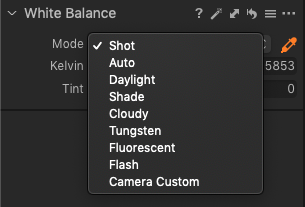
CaptureOne has quite the list of white balance options. Which is great for the photographer, but not so great for adhering to the TIFF standard.

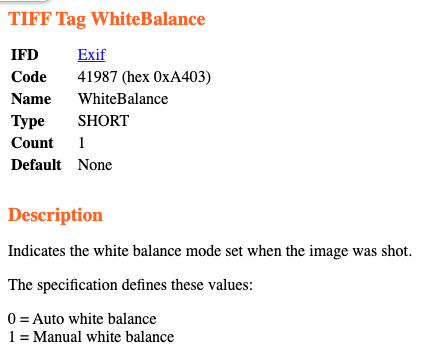
According to the EXIF TIFF Specification, there are only two values allowed for White Balance, Auto or Manual. A CaptureOne produced TIFF will have this value if Auto or Manual are not chosen:

41987 White Balance                   : Unknown (5)
37384 Light Source                    : Other

The different lighting situations should be identified using the “Light Source” 37384 tag, but alas they chose to add to white balance instead. When I asked about this, they responded that they requested this update to the TIFF spec, but they weren’t willing so they took matters into their own hands. You can read the conversation on the JHOVE issues page.

The TIFF format is very accepted in the Cultural Heritage community as a preferred preservation format. The specification is well understood and documented. I just hope we can continue to openly discuss issues that arise in preservation which add risk to our collections. Some issues are minor compared to others. Sometimes it’s the tools we use to validate formats like TIFF which are wrong and need to be corrected. The talk more about these issues and how to manage them.

Hemera Photo-Object

Many years ago I dabbled in a little Graphic Design. Working for a commercial printer in the Pre-Press area, I was very familiar with all things graphics, but never had a great talent for design, especially drawing. I often needed the random clip art for a design I was working on, so I purchased the Hemera, The Big Box of Art, probably from my local CompUSA if that dates me.

Hemera Big Box of Art

The cool thing about clip art from Hemera is it was not your usual JPG or TIFF format, it was in a special Photo-Object format. This format included the raster image, but also included a mask or alpha channel for the main object. They marketed this format as an alternative to the sometimes larger formats of the day. GIF files didn’t have the color depth and PNG was new enough, Hemera was probably hoping this format would be the next greatest thing to happen to clip art.

A Hemera Photo-Object has the extension HPI. Lets take a closer look at a file and see what is under the hood. I pulled this file from Disc 1 on Archive.org

The HPI file has a unique header which should make identification really easy. But what do we see starting at offset 32? A JFIF! Just after a 32 byte header the file has a standard JPG file hidden inside. Now a standard JPG file does not have the ability to support an alpha channel so there must be something else they have within to mask this file. Lets look for the EOF file marker for the JPG format.

Well, well, well. It appears the JPG file is then followed by a standard PNG! Sneaky. The entire HPI file is a 32 byte HPI header, a JPG, followed by a PNG. One could easily carve out each of the formats and save as separate files if needed. There is a script you can use to do this for you, written by Ed Halley. The original Hemera software won’t run on modern systems.

Hemera had a good run for about 10 years before selling off their assets in 2004 to another stock image company. At one point Hemera even purchased the rights to all of Corel’s Premium photo library which I covered in my article about the Kodak PhotoCD format.

Image PAC Files

I wouldn’t be surprised if you have never heard of an Image PAC file. You may know it by the more common name Kodak Photo CD Image. Kodak’s PhotoCD format actually refers to the system and Disc format used to store images for compatibility with other hardware. The Kodak PhotoCD format was pretty advanced for its time, it original purpose was to store scanned 35mm film to a disc which was playable on computers and other hardware. In fact, because it was meant to store 35mm rolls as they were scanned it was the first use of the linked Multi-session CD format made standard by the orange book specification. The format was widely adopted at first, but eventually lost favor and was abandoned by 2004.

The Kodak PhotoCD format was also used on many commercial CD-ROM products. One example was the Corel Professional CD series. Below is a photo of a case of 200 CD’s I recently acquired. Each has around a hundred PCD images and viewing software on disc. Most discs can be viewed here. Or you can view their “Sampler” CD-ROM.

The actual PCD image file format was referred to as an Image PAC File. The format was unique in the fact it has multiple resolutions built into a single file. It also stored the raster data in a format called Photo YCC color encoding metric, developed by Kodak. This requires conversion to RGB for many uses. Adobe Photoshop for many years had an import filter for the format built in which included ICC profiles for properly converting the source to a destination colorspace, but support was dropped in CS3 of their products.

Photoshop Kodak PCD import

The Image PAC PCD format was a proprietary format which Kodak protected aggressively, even to the point of threatening legal action to those who attempted to reverse engineer the format. This frustrated developers and was probably part of the reason the format was abandoned. Of course this didn’t deter some curious developers and was partially reversed engineered and is available in the NetPBM library formally knows as PBMPlus. The tool hpcdtoppm was developed to convert PCD to PBM.

The trick in preserving older obsolete formats is to find a way to first identify them, gather significant properties, then migrate to a modern format if appropriate with minimal loss of data. Luckily most PCD files have the ascii string “PCD_IPI” starting around offset 2048. This is basically how the PRONOM registry identifies the format and has assigned it fmt/211. Exiftool also supports the format in identifying some of the significant properties.

ExifTool Version Number         : 12.62
File Name                       : 136009.PCD
Directory                       : /Users/thorsted/Desktop/blog/Kodak/PCD
File Size                       : 3.6 MB
File Modification Date/Time     : 2023:06:23 10:48:55-06:00
File Access Date/Time           : 2023:06:26 23:43:50-06:00
File Inode Change Date/Time     : 2023:06:27 11:18:38-06:00
File Permissions                : -rwx------
File Type                       : PCD
File Type Extension             : pcd
MIME Type                       : image/x-photo-cd
Specification Version           : 0.6
Authoring Software Release      : 3.0
Image Magnification Descriptor  : 1.0
Create Date                     : 1993:09:20 07:35:34-06:00
Image Medium                    : Color reversal
Product Type                    : 116/01 SPD 0064  #00
Scanner Vendor ID               : KODAK
Scanner Product ID              : FilmScanner 2000
Scanner Firmware Version        : 2.21
Scanner Firmware Date           : 
Scanner Serial Number           : 0296
Scanner Pixel Size              : 0b.30 micrometers
Image Workstation Make          : Eastman Kodak
Character Set                   : 95 characters ISO 646
Photo Finisher Name             : HADWEN GRAPHICS
Scene Balance Algorithm Revision: 3.1
Scene Balance Algorithm Command : Neutral SBA On, Color SBA On
Scene Balance Algorithm Film ID : Unknown (131)
Copyright Status                : Restrictions apply
Copyright File Name             : RIGHTS.USE
Orientation                     : Horizontal (normal)
Image Width                     : 3072
Image Height                    : 2048
Compression Class               : Class 1 - 35mm film; Pictoral hard copy
Image Size                      : 3072x2048
Megapixels                      : 6.3

Exiftool is able to gather much of the important properties including an original creation date and the pixel dimensions. It would be nice if was able to mention each of the resolution options as some later Pro versions of PCD had a 64 base for resolutions of 4096 x 6144.

Migration to a more modern open format is a common preservation strategy. The National Archives and Records Administration has the format NF00224 listed as needing to migrate to JPG, while others prefer migration to TIFF. Others have learned valuable lessons attempting to find the right method for migration. There is a right way and a wrong way as the Center for Digital Archaeology learned. The easiest method is to use the popular ImageMagick command-line tool.

thorsted$ identify 136009.PCD 
136009.PCD PCD 768x512 768x512+0+0 8-bit YCC 3.44727MiB 0.020u 0:00.006
thorsted$ convert 136009.PCD[5] -colorspace sRGB +compress 136009.tif
thorsted$ identify 136009.tif
136009.tif TIFF 3072x2048 3072x2048+0+0 8-bit sRGB 18.0004MiB 0.000u 0:00.000

ImageMagick along with most other tools like IrfranView and XnView only see the base resolution of 768 x 512, but with an extra little addition to the command by adding “[5]” after the filename if forces the conversion to use the “Fifth” 16 Base resolution which is the highest resolution on most PCD files, the Pro versions may have higher. The other issue is the colorspace conversion. It is known there could be a loss of highlights. This webpage illustrates different tools and the issues with highlights. You can see the difference if I use -colorspace RGB instead of sRGB.

ImageMagick conversion using RGB vs sRGB colorspace setting.

Other tools such as the open source pcdtojpeg and paid pcdMagic both work well, but the only tool I have tested so far which keeps the original metadata is pcdMagic.

ExifTool Version Number         : 12.62
File Name                       : 136009_1.tif
Directory                       : .
File Size                       : 38 MB
File Modification Date/Time     : 2023:06:27 12:06:26-06:00
File Access Date/Time           : 2023:06:27 12:06:29-06:00
File Inode Change Date/Time     : 2023:06:27 12:06:27-06:00
File Permissions                : -rw-r--r--
File Type                       : TIFF
File Type Extension             : tif
MIME Type                       : image/tiff
Exif Byte Order                 : Little-endian (Intel, II)
Subfile Type                    : Full-resolution image
Image Width                     : 3072
Image Height                    : 2048
Bits Per Sample                 : 16 16 16
Compression                     : Uncompressed
Photometric Interpretation      : RGB
Image Description               : color reversal: Unknown film. SBA settings neutral SBA on, color SBA on
Make                            : KODAK
Camera Model Name               : FilmScanner 2000
Strip Offsets                   : 1622
Samples Per Pixel               : 3
Rows Per Strip                  : 2048
Strip Byte Counts               : 37748736
Planar Configuration            : Chunky
Software                        : pcdMagic V1.4.19
Modify Date                     : 2023:06:27 12:06:26
Copyright                       : Copyright restrictions apply - see copyright file on original CD-ROM for details
Exif Version                    : 0231
Date/Time Original              : 1993:09:20 07:35:34
Create Date                     : 1993:09:20 07:35:34
Offset Time                     : -06:00
User Comment                    : color reversal: Unknown film. SBA settings neutral SBA on, color SBA on
Color Space                     : Uncalibrated
File Source                     : Film Scanner
Profile CMM Type                : Unknown (KCMS)
Profile Version                 : 2.1.0
Profile Class                   : Display Device Profile
Color Space Data                : RGB
Profile Connection Space        : XYZ
Profile Date Time               : 1998:12:01 18:58:21
Profile File Signature          : acsp
Primary Platform                : Microsoft Corporation
CMM Flags                       : Not Embedded, Independent
Device Manufacturer             : Kodak
Device Model                    : ROMM
Device Attributes               : Reflective, Glossy, Positive, Color
Rendering Intent                : Perceptual
Connection Space Illuminant     : 0.9642 1 0.82487
Profile Creator                 : Kodak
Profile ID                      : 0
Profile Copyright               : Copyright (c) Eastman Kodak Company, 1999, all rights reserved.
Profile Description             : ProPhoto RGB
Media White Point               : 0.9642 1 0.82489
Red Tone Reproduction Curve     : (Binary data 14 bytes, use -b option to extract)
Green Tone Reproduction Curve   : (Binary data 14 bytes, use -b option to extract)
Blue Tone Reproduction Curve    : (Binary data 14 bytes, use -b option to extract)
Red Matrix Column               : 0.79767 0.28804 0
Green Matrix Column             : 0.13519 0.71188 0
Blue Matrix Column              : 0.03134 9e-05 0.82491
Device Mfg Desc                 : KODAK
Device Model Desc               : Reference Output Medium Metric(ROMM)
Make And Model                  : (Binary data 40 bytes, use -b option to extract)
Image Size                      : 3072x2048
Megapixels                      : 6.3
Modify Date                     : 2023:06:27 12:06:26-06:00

There is a way to convert the PCD to TIF using ImageMagick, then using Exiftool to map some of the metadata over to the new TIFF file. It would look something like this:

exiftool -addtagsfromfile 136009.PCD '-EXIF:DateTimeOriginal<PhotoCD:CreateDate' '-EXIF:CreateDate<PhotoCD:CreateDate' '-ExifIFD:SerialNumber<PhotoCD:ScannerSerialNumber' '-ExifIFD:ExifImageWidth<PhotoCD:ImageWidth' '-ExifIFD:ExifImageHeight<PhotoCD:ImageHeight' '-IFD0:Make<PhotoCD:ScannerVendorID' '-IFD0:Model<PhotoCD:ScannerProductID' '-IFD0:Orientation<PhotoCD:Orientation' '-IFD0:Copyright<PhotoCD:CopyrightStatus' 136009.tif

JPG Structure

If you hadn’t been over to see the posters made by Ange Albertini, head over now. Below is his poster on the JPG image file format. This is the basic JFIF file format, which stands for JPEG File Interchange Format. There are also raw JPEG streams and Exif, Exchangeable Image File Format.

The basic format is pretty straight forward. There is a start of image marker FFD8 some format information, then the raster compressed data, then an end of image marker FFD9. Identification of a JPEG file should be pretty straight forward. Knowing the start and end marker values and then the type of JPEG based on the Application data, can be very specific. That is until some software engineers start playing fast and loose with the format specifications.

A while back I received a JPG file which didn’t identify using the latest PRONOM signature. It’s happened before, some new phones came out and started using a newer version of the exif specification so I submitted an update to PRONOM for JPG’s using exif 2.3 and greater. But also may need to submit another signature soon for the newly released Exif 3.0 specification! But this JPG I received wasn’t a new version, it should have been identified with the current PRONOM signature. It started with FFD8 and when I went to look at the end of the file for the end of image marker FFD9, it wasn’t where I expected it to be.

This JPG file had an additional 9632 bytes after the FFD9 end of image marker. But why? The image rendered just fine in multiple JPG viewers. The only warning from Exiftool was for “Unrecognized MakerNotes”, which is not too uncommon. So I went to the JPG Exif specification.

EOI, Recording this marker is mandatory. It shall be recorded in this position.

But reading a little further we see…..

Moreover, Exif/DCF readers should be implemented to operate without interruption even if certain kinds of data have been recorded after EOI of the primary image defined in the Exif standard. Specifically, unknown data after EOI of the primary image should be skipped. (see section 4.7.1)

So the extra data is allowed by specification. Any readers should ignore or skip any data after the EOI (End of Image). Well that makes identification more difficult. All the PRONOM signatures are based on having the EOI marker at the “End”. Some have allowance for padding, but not enough for the worst offenders……

The image referenced above was created on a Huawei MHA-L29 cameraphone. But since finding this image, I have also found many Samsung phones do the same thing. Here is one from a Samsung SM-G975U1. Much less padding but enough to throw off identification.

Apple iPhones are also not exempt from this “feature” either. When using the MacOS ImageCapture tool with the HEIC format, a bug can add an excessive amount of empty data at the end of the converted JPG file.

So, when it comes to identification, if your JPG files don’t seem to identify correctly, look closer at the end of the file, it may have some “extra” data.

What’s the 411?

I am dating myself by using the phrase “What’s the 411?” Back in my day (before the Googles), if you wanted quick information you could pick up the “land line”, a corded phone in your home which could only make phone calls, and dial 4-1-1 and you would be connected to an operator that could help you locate businesses, tell you the time, answer simple questions, and was infinity smarter than Alexa.

Around the same time I was using 4-1-1 to answer all my questions, digital camera’s were just coming on the scene. One of those was the Sony Mavica line of digital camera’s. They were unique as they used a floppy disk as the storage media. They had a small LED screen for capture and playback of the captured images. In order to quickly preview the images captured on disk, the camera generates a hidden thumbnail file for each image, this file has the extension .411. When I first saw this file when I copied a floppy from my Mavica cameras, it reminded me of the old information line. I first assumed it was a metadata file as the first few Mavica camera did not use EXIF in their files, but they are simply a raster image in a 64×48 pixel file. Of course Sony did not document this file format and probably hoped no one would noticed as they are hidden on the floppy FAT12 formatted disk.

Video showing index of floppy disk.

One could argue the value of documenting and possibly identifying thumbnail formats as many in digital preservation have chosen not to keep the Thumbs.db file or other hidden files not meant to be preserved or accessible to the user. I have found documenting any format found through technical appraisals provides value to everyone, which may ultimately determine not to keep such formats in their repository, but knowing what they are is vital to the process. Come listen and chat with me about this topic at iPres 2023!

Usually the first part of documenting a format is looking for specifications online or documented somewhere. Since Sony did not publicly release any specifications for this format, we have to use others reverse engineering or do so ourselves. There have been a few attempts to document a conversion of the 411 format to a common raster format like BMP. Like this C code for conversion to BMP, or to NetPBM formats like PPM, or the Java “Javica” software which makes use of the 411 files. My first step was to see if we could find some common patterns in the many samples I have from my Mavica collection. Running Marco Pontello’s TrIDScan, across my 54 samples came up with no common patterns, this was expected as all the reverse engineering efforts points out the format is probably based on the CCIR.601 specification which is MPEG based on frames.

With no common patterns among all the samples, creating a PRONOM signature is not possible. In the future, file identification may be based more on dynamic pattern matching instead of the current static patterns we look for now. Until then, this may need to be submitted as an extension only entry. Two things to note, the files created by the camera are all named starting with “MVC” which could also be used for identification. You may also notice that every .411 file is exactly 4608 bytes. The extension .411 is also pretty unique, so I doubt it will clash with any other format for the moment.

3M Printscape

There are some file formats out there which are confusing. One such file came across my desk awhile back. This file was not identifiable with any tools I threw at it. At first I believed it to be a TIFF file variant.

You can see the TIFF header, but would not open as one, even if the extension was changed from PSC to TIF. The other hint was the phrase “3M Printscape”, I had never heard of it and there wasn’t much information available about it. It seems it was a creative product made by 3M in the early 2000’s. You could buy a package of printable cards, gift bags, etc. The problem was, there was no available software to be found. I searched on the Internet Archive, the Wayback Machine, and many other abandoned software sites. For months I searched, it wasn’t until a year later I came across one of the creative packages at thrift store. I was thrilled. That is until I was able to get the software installed.

After I installed the software in a virtual machine running Windows 98 I tried to open the PSC file but the software was looking for files with the extension STD, which is an unfortunate acronym. Turns out it stands for SureThing Document. SureThing is a software company who develops Label software. After many months of searching I thought I had found the software to render my file, but it was not meant to be.

Many months later I decided to do some more searches. That is when another copy of 3M Printscape showed up in the Internet Archive. 3M Printscape 2.0! It appears 3M decided to design their own software for version 2.0.

The preservation value of the above image is not lost on me. What took me over a year to figure out ended up being a simple pixelated image of a cardinal. Its the journey, not the destination?

From this little adventure I was able to submit two file formats to PRONOM, fmt/1275fmt/1276. Also I documented the formats and linked to the software on the File Format Wiki. The 3M Printscape version 2 was also released for Macintosh, so the signature had to account for endianness, just like a TIFF file would. With the format having the string “3M Printscape” in the header, it made for an easy signature.

Hopefully, I will be the last to spend this much time on an image of a bird.