LUTS

If you are looking for LUTs, you’re in luck. There is a website for sharing your FreshLUTs. Even though they are fresh, they are probably not as exciting as one might think.

LUTs are short for Look-Up Tables, which doesn’t sound as exciting as you were probably hoping. They are a pretty interesting process for dealing with color in high end Image and Video processing applications. Often called 3D Look-up Tables, they are used for color grading, an essential step in film production and restoration to map from one color space to another. LUTs are not to be confused with ICC profiles which aim for color accuracy, while LUTs are looking for more color quality and aesthetics.

There are a lot of LUT formats out there, it seems. In looking into this format, I have found dozens of others to investigate, but today lets look at the four available as an export from Photoshop.

Above you can see a simple screenshot for the export of different formats from Adobe Photoshop. Adobe is one of the biggest developer and supporter of the formats used in LUTs, but there are many other graphics tools which create and support LUTs. In this Photoshop export we can see four formats included in the export. Lets take a look at each of these.

ICC Profiles are well documented and available for identification in PRONOM.

filename : 'LUTs-Export-s01.icc'
filesize : 197024
modified : 2025-02-25T09:37:24-07:00
errors :
matches :
- ns : 'pronom'
id : 'fmt/1975'
format : 'ICC Profile'
version : '2'
mime : 'application/vnd.iccprofile'
class : 'Dataset'
basis : 'extension match icc; byte match at 8, 32'

But the other three are plain text files and still identify as such. Let us start with the CUBE format.

filename : 'LUTs-Export-s01.cube'
filesize : 884963
modified : 2025-02-25T09:37:24-07:00
errors :
matches :
- ns : 'pronom'
id : 'x-fmt/111'
format : 'Plain Text File'
version :
mime : 'text/plain'
class :
basis : 'text match ASCII'
warning : 'match on text only; extension mismatch'

cat LUTs-Export-s01.cube
#Created by: Adobe Photoshop Export Color Lookup Plugin
#Copyright: (C) Copyright 2025 ObsoleteThor
TITLE "LUT-export-s01"

#LUT size
LUT_3D_SIZE 32

#data domain
DOMAIN_MIN 0.0 0.0 0.0
DOMAIN_MAX 1.0 1.0 1.0

#LUT data points
0.000000 0.000000 0.000000

The CUBE format was first developed by IRIDAS in 2003 as a answer to ensure interoperability with other software. Adobe acquired IRIDAS in 2011 in a effort to be a leader in the color grading and enhancement market. They have published the CUBE specifications for version 1.0 in 2013.

A Cube file is a text file that defines a look-up table in the Cube format.
The Cube look-up tables store RGB values.
Advantages of the Cube format include:
  • The Cube format can describe look-up tables for a wide range of purposes, from simple gamma adjustments for display output to complex HDR image processing.
  • The format is well suited for professional digital cinema applications and for both normal range and High-Dynamic Range image processing.
  • As Cube files are text files, they are easily edited or reviewed using a text editor.
  • A Cube file can include three 1-dimensional tables or one 3-dimensional table.
  • The tables can be in a wide range of sizes.
  • Cube files are trivial to write and read.
  • All values are human-readable as they are in decimal form, and can be of high precision.
  • The input domain and output range are not limited to the range 0.0 to 1.0.

According to the specifications, a CUBE file can be a One-Dimensional Cube file or a Three-Dimensional Cube file. From the example above you can see the file is a Three-Dimensional file with the required line “LUT_3D_SIZE“. But in a One-Dimensional file, the required line is “LUT_1D_SIZE“.

cat Demo.cube
TITLE "Demo"
LUT_1D_SIZE 3
DOMAIN_MIN 0 0 0
DOMAIN_MAX 1 2 3
0 0 0
# Comments can go anywhere
0.5 1 1.5
1 1 1

Each CUBE file has one or the other and should be an easy string to look for. It is in a variable position as there can be comments before the required line and also may have a TITLE line. The TITLE and DOMAIN lines are common to every file but not required.

Now, the CUBE format is a bit different depending on the source. They all seem to have the same header, but different elements. It seems the IRIDAS Cube format is the most interoperable. The Truelight Cube format generally has the CUB extension, and the Cinespace Cube has the CSP extension, which will look at next/ You can read more about the differences on this format comparison table. This LUTCalc web site has many different types of Cube’s it can output, so there are some differences.

The other file format available in the export is a CSP. The CSP is also a plain text file, often called a cineSpace LUT file. This format come from the cineSpace software, a color management software for the film and television industry.

cat LUTS-s01.csp 
CSPLUTV100
3D

BEGIN METADATA
#Created by: Adobe Photoshop Export Color Lookup Plugin
TITLE "LUTS"
END METADATA

2
0.0 1.0
0.0 1.0
2
0.0 1.0
0.0 1.0
2
0.0 1.0
0.0 1.0

32 32 32
0.000000 0.000000 0.000000

The CSP File Format specifications outlines header and the other two sections.:

The cineSpace LUT format contains three main sections.
Header
This section contains the LUT identifier and the LUT type, 3D or 1D.
It is made up of the first two (2) valid lines in the file. See Notes below for the definition of a valid line.

Examples
• (3D LUT) header:
CSPLUTV100
3D
• (1D LUT) header:
CSPLUTV100
1D

So there is a pretty obvious header to work with in identification. “CSPLUTV100” can be used to identify both 1D and 3D CSP files.

The other format available to export from Photoshop is 3DL. They seem to be connected to the Assimilate Inc. company and software. A specification has been posted, and it looks like there is only ASCII and not much in the way of a header.

cat LUTS-s01.3dl 
#Created by: Adobe Photoshop Export Color Lookup Plugin
#Description: LUTS
0 33 66 99 132 165 198 231 264 297 330 363 396 429 462 495 528 561 594 627 660 693 726 759 792 825 858 891 924 957 990 1023

It does not appear there is any headers or static strings to use for identification. The specification calls the format, 3DL ASCII format and that “All lines starting with ‘#’ are treated as comments.” Because of this, I don’t think positive identification can happen at this time.

For now I am just proposing 2 new file formats to PRONOM, The CUBE format And the CSP Format. Click on my GitHub submission page to see the signatures and enjoy some samples!

Apple Mail

There really is no “Macintosh Format”, but there sure are a lot of formats you only find on the MacOS. From Resource Forks and iWork formats to unique sound formats, MacOS has them all! Majority of cross-platform software vendors have done a much better job in recent years in making their file formats the same across platforms, but for Apple, they love to make things unique, just for their platform.

Take EMLX for example. Seems to be a trend to add “X” to the end of an older format to breath new life into it. The EML format, or Electronic Mail, has existed for a few decades now, but in 2005 Apple updated their Apple Mail application to use a new format, EMLX.

As far as I know, Apple hasn’t released any documentation on the EMLX format, but many folks out there have asked the question and have been able to “reverse engineer” the format. Lets take a look.

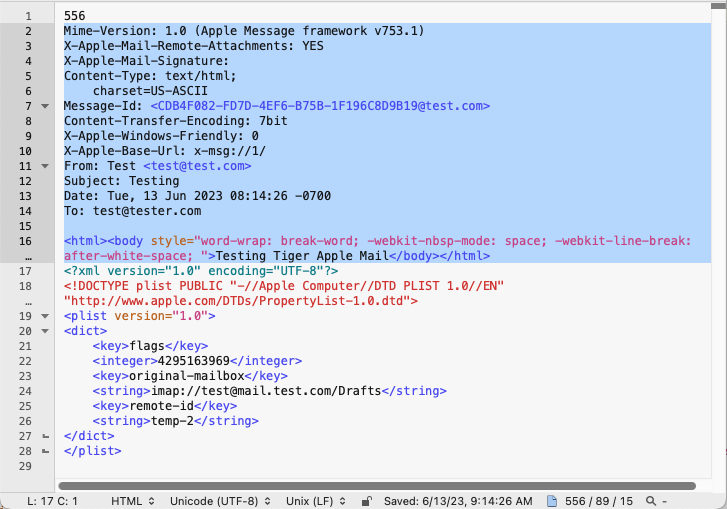
An EMLX file consists of three parts:

  • bytecount on first line;
  • email content in MIME format (headers, body, attachments);
  • Apple property list (plist) with metadata.

The bytecount is a variable number which consists of the total bytes starting from the start of the MIME format, including HTML, to the start of the XML property list. Lets look at a simple EMLX.

The byte count is on line 1 with the MIME email (EML) taking up the 556 bytes, then the XML plist at the end. You may ask, what is a plist? Well, it is another Apple (originally NextStep) invention which is embedded throughout the MacOS operating system. A Plist is usually an XML with keys but can also be in a binary format. The Plist can contain properties of the email within Apple Mail like special color flags, tagged as junk, date received and last reviewed.

If you do happen across an EMLX file or group of them, there are a few tools you can use to convert them to a plain old EML. There are python libraries or many other tools to do the job.

But first we need to be sure of identification beyond the extension. Adding this file format to PRONOM would help in identification for preservation purposes. If ran through PRONOM today we get:

filename : '9.emlx'
filesize : 18582
modified : 2023-10-26T22:16:25-06:00
errors   : 
matches  :
  - ns      : 'pronom'
    id      : 'fmt/950'
    format  : 'MIME Email'
    version : '1.0'
    mime    : 'message/rfc822'
    class   : 'Text (Structured)'
    basis   : 'byte match at [[31 17] [599 4] [339 6] [426 6] [90 14]]'
    warning : 'extension mismatch'

Because the format has a EML plain text format within its structure, it is assumed to be an EML file. While technically accurate, Identifying as a unique EMLX format would be beneficial in a preservation system so you can properly assign risk and choose the right tool to parse or migrate.

In looking at the three parts of an EMLX format, we know the EML file is not a good way to show the difference as they are the same structure. The byte count on the first line is variable, so there is no static byte sequence to use for identification. That leaves the Plist section at the end to distinguish the difference.

The PRONOM entry for a Plist looks for the typical XML strings present in most XML files, but then uses the root element “<plist version=”1.0″>” for identification. We could combine the existing EML signature and the Plist signature to identify an EMLX, or just take the existing EML signature and put in a small byte sequence for the closing of the </plist> tag near the EOF? There would be a need for a priority over EML, both would essentially accomplish the same thing.

Take a look at latter idea on my GitHub page and tell me which makes the most sense.

Student Writing Center

When it comes to difficult file formats, one of the more difficult groups of formats are word processing text files. Difficult for many reasons, one being the shear number of them, the other is their lack of identifiable headers. Just when you think you have seen them all another pops up to add to the mix.

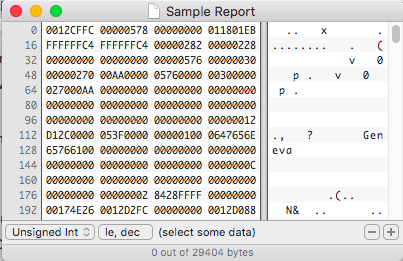
In a batch of other known word processing formats I came across a few files with no extension and with the following header:

The rest of the file was binary so the only thing I had to go one was the string “TLC” and “FF”. A few searches across the interwebs didn’t reveal much, seems it wasn’t a well documented format. From the names of the files and the fact they were with other word processing formats led me to assume they were also some sort of document format. The date stamps were still intact and I could see they were from the mid 1990’s. It took a few creative searches before I wondered if the “TLC” might have something to do with “The Learning Company“. If it was, I still had quite a bit of work ahead as the software developer had produced quite a few titles over the years. You probably remember the “Reader Rabbit” series of educational games.

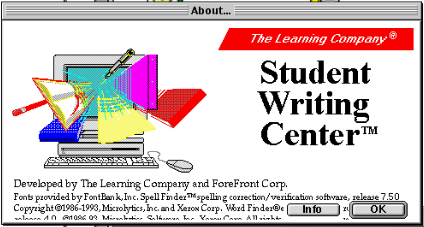
After a bit of time I narrowed it down to a few titles and started looking for samples of each. Software was hard to find as well. I tried opening the file in a few different software until I finally came to one called “Student Writing Center”. Which may sound familiar to some of you, but there was some variations on this name out there. Some of which are:

  • Student Writing Center
  • Student Writing & Publishing Center 
  • The Children’s Writing & Publishing Center
  • The Writing Center
  • Ultimate Writing & Creativity Center

There were probably others, considering the budget software company started in 1980 and made titles for a few computer platforms starting with the Apple II. The story behind the company is a fun read.

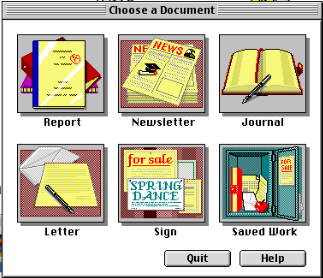
The Student Writing Center was a simple word processor aimed at students 10 years old and older. It was found in many schools right along side Kid Pix, another very popular graphic program for kids. The software had a few different document types to help students get started writing their book reports or journal entries.

The Student Writing Center ran on both Macintosh and Windows allowing it to be one of the more popular writing tools for the younger crowd.

Each document type had a unique interface and save menu, which on Windows would save with the extensions, .RP, .NL, .JN, .LT, and .SG. They also had a slightly different header.

Reports:        1A544C43 01464600 0000
Newsletters:    1A544C43 00464600 0300
Journals:       1A544C43 00464600 0100
Letters:        1A544C43 00464600 0400
Signs:          1A544C43 00464600 0200

The signatures submitted to PRONOM take into account endianness for Windows and Macintosh with the last two byte locations being swapped. Also every document had the values “46461A” “FF” at the end of the file.

But wait! Just when you think you had it figured out…….

This file may look similar, but they are two different formats and are not compatible with each other. The little brother to the Student Writing Center was called “Ultimate Writing & Creativity Center” and was made for younger kids, ages 6-10. It had more of a cartoon interface and a cute little fountain pen teacher to walk you through the writing process.

When you saved your file in UWCC, you could choose between formats and I guess move your documents up to the more advanced program once you turned 10! If you would like to experience or re-live the opening sequence, enjoy.

I’m not done yet………

To complicate things even more The Learning Company also released another word processor called “The Writing Center“. This gets confused with Student Writing Center frequently.

But unlike the two others, this format is very different.

We’ll have to save this format for another day.

There seems to be a never ending list of word processor formats, with no end in sight. But if you used a school computer back in the early 1990’s and still have your floppy disk from back then, hopefully now you can open that report you wrote on Abraham Lincoln.

GEDCOM

One of the first PRONOM signatures I submitted was for a format I felt responsible for, considering where I worked. This is the GEDCOM format, which is an acronym for GEnealogical Data COMmunication. At the time I submitted the signature the format hadn’t been updated in years.

Very recently it has seen a renewed interest from those in the Genealogical community. In 2021 the format was renewed with a Version 7 specification with the purpose of simplifying and clarifying the format. In addition a new format was released to handle storing multimedia files in a container called GED-ZIP.

My first attempt at a signature was based on the specification generally, but with the new version released, I thought it might be good to revisit this format and see if we need to make any adjustments. There needs to be a new signature for the GED-ZIP format as well.

The original signature, fmt/851, created for PRONOM is:

302048454144{0-1024}47454443(0D0A|0D|0A)322056455253

It has an offset of 0-3 to account for any Unicode BOM, but starts with “0 HEAD”; this is the required start to a GEDCOM file. The next bits can be a source of the software which created the GEDCOM, using the tag “SOUR” which can also include a version of the software and name and address of the developer. This can take a bit of space so we include 0-1024 bytes for this information. The next tag is the subrecord of HEAD, “GEDC”, then the next subrecord, “VERS”. Most GEDCOM validations will look for HEAD.GEDC.VERS for the version of GEDCOM the file claims to conform with. The hex values, (0D0A|0D|0A), is the hard return accounting for the different systems that could write the GEDCOM.

A minimal GEDCOM version 5.5 would contain the following.

0 HEAD
1 GEDC
2 VERS 5.5
0 TRLR

The end of the file is marked by the tag “TRLR” in reference to a Trailer. I didn’t include this in my initial signature, but probably should have.

GEDCOM files have been around a long time, the first draft was released in 1984, but the GEDCOM structure we see now really didn’t come along until version 3 in 1987, when the format was standardized and made public. The HEAD.GEDC.VERS wasn’t standardized until version 4. You can see the history here.

So moving forward we should probably have a new PUID for Version 3, Version 4, Version 5 and the new Version 7 and leave the existing signature as is.

Version 3 only requires the tags HEAD, SOUR, DEST and the ending TRLR.

BOF 302048454144(0D0A|0D|0A)3120534F5552{0-128}312044455354
EOF 302054524C52

Version 4 requires the HEAD.GEDC.VERS sequence.

BOF 302048454144{0-1024}47454443(0D0A|0D|0A)3220564552532034
EOF 302054524C52

Version 5 is similar.

BOF 302048454144{0-1024}47454443(0D0A|0D|0A)3220564552532035
EOF 302054524C52

Version 7 is also similar.

BOF 302048454144{0-1024}47454443(0D0A|0D|0A)3220564552532037
EOF 302054524C52

For the new GED-ZIP format we need to create a container signature as the format is a ZIP file but with a GEDCOM inside. The GED-ZIP specifications states:

A GEDCOM ZIP file should:
• include exactly one GEDCOM file with the name “gedcom.ged”
• include all the multimedia objects references by that GEDCOM file
• not include unreferenced multimedia objects

Our Container signature would look like this:

<ContainerSignature Id="1000" ContainerType="ZIP">
 <Description>GEDZIP</Description>
  <Files>
   <File>
     <Path>gedcom.ged</Path>
      <BinarySignatures>
       <InternalSignatureCollection>                    
	 <InternalSignature ID="300">
	  <ByteSequence Reference="BOFoffset">
	    <SubSequence Position="1" SubSeqMinOffset="0" SubSeqMaxOffset="3">
	      <Sequence>30 20 48 45 41 44</Sequence>
	    </SubSequence>
	  </ByteSequence>
	</InternalSignature>
      </InternalSignatureCollection>
     </BinarySignatures>
    </File>               
   </Files>
</ContainerSignature>

I recently learned of a variation on the GEDCOM format which can cause a lot of confusion. The software Family Tree Maker could export to the GEDCOM format, but had a checkbox which, unchecked, allowed you to not abbreviate the tags. The tags in the GEDCOM format are expected just the way they are, which makes me wonder why they would do something so confusing. You can read more about this format here.

I was recently made aware a few of these rouge “GEDCOM” files were out there, in the wild, causing confusion during identification. My first thought was to adjust the signature to make it a little more loose to fit these variations, but then discovered they are not GEDCOM files. In fact later versions of FTM forgot they did this and would error when you tried to import them back into the software. I think it would be wise to identify these FTM GEDCOM variants, just so one is aware of the difference and can then decide how to handle them properly.

The format was named “FTW TEXT”, so we can use that to call the new signature. Instead of “0 HEAD”, “0 HEADER” is used, instead of “0 SOUR”, “0 SOURCE” is used, and instead of “0 TRLR” at the end, “0 TRAILER” is used.

BOF 3020484541444552(0D0A|0D|0A)3120534F55524345
EOF 3020545241494C4552

It was fun to look back at this format and try and improve on it a bit. I learned more than I did when I initially wrote the signature and hopefully documented it well enough. The FTM variant was an interesting twist I was not expecting, which I am sure will show up again in the future. Take a look at the signatures and samples I updated and let me know what you think.

RIS Citation

Up until recently I was working in a Corporate archive preserving all sort of content. The corporation throughout the years used many different software packages to produce all sorts of data. When I moved to an academic library I saw much of the same content, but there was a some new file formats which I needed to document and manage. Many of those come from scholarly journals , theses, dissertation, and data sets for projects.

One format which I came across often but seems to be missing from the standard file format known lists was the RefMan citation format. This format is a simple text based format which serves to standardize citations from scholarly sources. Created by Research Information Systems, the format uses the RIS extension used by Procite and Reference Manager (RefMan). ISI ResearchSoft managed the format for a bit in the 1990’s, this is where you can find most of the specifications.

Now that I am a little more familiar with the format I see it everywhere! Find any scholarly journal and there will usually be a “cite” feature to download the citation in a few formats, RIS being one of the most common.

Example: Theory and Craft of Digital Preservation

It can be called by a few names, mostly based on the systems which support it. You might see Ris (Zotero), or EasyBib, Mendeley, ProCite, Reference Manager, and others. But they all follow the same format.

The format is simple plain text format, there are codes which indicate the different field types and tags. The basic structure would look like this:

TY  - BOOK
AU  - Owens, Trevor 
LA  - eng
PB  - Johns Hopkins University Press Baltimore, Maryland
CY  - Baltimore, Maryland
SN  - 9781421426976; 1421426978
PY  - 2018
TI  - The theory and craft of digital preservation
LK  - https://worldcat.org/title/1030899528
ER  - 

The first tag always needed to be “TY” and the last tag “ER”. TY stands for Type of reference and ER stands End of reference.

There is actually two versions of the format, this original specification and a later one which added some header information. You can download the full documentation here.

Provider: The name of the information provider (required)
Database: The name of the database (optional)

Tagformat: Name of the tag format used identify fields (optional)
Content: media type for the body of the file (required)

Creation of a PRONOM signature for this text format is pretty straight forward. Looking for the TY and ER string should be enough to ensure the format doesn’t clash with other text based formats. Text formats are notoriously difficult to identify, but when they have expected patterns it makes it a little easier. I had to add a little buffer at the beginning of the signature to allow for the newer header information, but more samples will be needed to see if this is enough to identify the format in all situations. Take a look and see if it works for you!